Showing posts with label cupcakes. Show all posts

September 27, 2017

Harry Potter Party

This party took place in 2012, so this post has been a long time coming! Nowadays there are thousands of Harry Potter party posts and ideas, but hopefully you will find something worth taking a look at in my post. This was probably the most time-consuming party I have done. I made 2 invitations, costume pieces, decorations, potions, food, decorations, treat boxes, and wrote scripts for all of the activities we had!  But my kids and I think this was also the most fun party we have done. We are huge Harry Potter fans, so it was easy to get pulled into the fun themes. I'll try to be as descriptive as possible, but it's been 5 1/2 years! Haha. Feel free to ask questions in the comments and I'll do my best to answer.

INVITATIONS:
We actually had 2 invitations, which seems ridiculous, but we wanted a specific number of students for our activities (and Quidditch) and were willing to invite other friends to make the right number! All of the boys we invited were super excited to come, and we got a unanimous YES on all of the pre-invites. Noah was also very excited for this party - you only turn 11 once! And it happened to be his Golden Birthday also. (11 years old on the 11th.)
"It is real, isn't it? It's not a joke? Petunia says you're lying to me. Petunia says there isn't a Hogwarts.
It is real, isn't it?" ~ Lily Evans
You can find the printables for them on justsweetandsimple blog. (Check out all of her Harry Potter posts for some great ideas and printables!) In Microsoft Publisher I put the front and back on the same page, which when folded in fourths created the outside look of the envelope, and the inside information onto one sheet of paper for each. I printed them on parchment paper and then taped them shut. These would be great for a main invitation also for a party, but for ours, the boys were going to receive their official Hogwarts acceptance letters.

"It's real for us, not for her. But we'll get the letter, you and me." ~ Severus Snape
We formatted the letter after Harry's in the book (and hundreds of ideas online), and even had a pretty convincing signature from Professor McGonagall (find it on a Pinterest search). A ticket to board the Hogwarts Express was included in each invitation. All were printed on parchment paper and antiqued with an ink pad. Since our last name starts with H, it was an easy decision to invest in wax and a seal that I purchased at Michael's craft store. My son had been to all of his friend's homes, so I asked him where their bedrooms were located and we put that location on each envelope. We had originally planned on doing white helium balloons with owls drawn on them, but I just didn't want to spend the time to draw 12 owls on balloons!  Plus, some invitations were easier sent to school, and all weren't going to be delivered on the same day. So we opted for a printed white owl on card stock to be delivered with each invitation.

DECOR:

"Don't talk rubbish. There is no platform nine and three-quarters." ~ Muggle Vernon Dursley
I borrowed some decor items, like this Hogwarts Banner, from a friend who had a Harry Potter party for her son, and the rest I made, like the Hogwarts Express sign and the brick wall. For the wall, I bought an inexpensive twin-sized sheet and a large foam grout sponge and dipped the sponge in acrylic paint and then across the sheet. Afterward I cut an opening up the middle for the kids to go through. We had to remember to keep the front door open though in case any of them decided to run to get through!

"Gringotts, the wizard bank! Ain't no safer place. Not one. Except perhaps Hogwarts." ~ Rubeus Hagrid
I made a handled bag for each boy to keep all of their supplies in, and we wrote their names on the golden cups on each bag. I found the cup die cuts at the local dollar store in the teacher section. The House Cup trophies and gold coins were purchased at Zurcher's party store, and I taped white feathers to black pens for their quills.

For a free copy of the textbooks click here. Print, stack in the proper order and staple in the middle and they should line up in the correct order according to topic.

Fortius Quo Fidelius. "Strength through loyalty." ~ Gringotts motto

"That’s what Hermione does," said Ron, shrugging. "When in doubt, go to the library."

CAKE and FOOD:
I think I tried a little too hard to make my son Noah's cake look messy. The result is that Hagrid's cake decorating skills in the movie look better than mine! Haha! And the cake box I bought from our local grocery store bakery was huge, so the result was quite comical, but it tasted good and my son was happy. :)  We had this cake on his actual birthday and I made gluten-free cupcakes (from a mix) for his party so one of the boys coming would finally be able to have one along with the rest of the kids. None of the other boys even noticed, but that boy was so excited he ate 4 and his mom cried because he was actually accommodated for! We had a list of safe items for him to eat with the rest of the meal also.

"Before we begin our banquet, I would like to say a few words. And here they are: Nitwit! Blubber! Oddment! Tweak! Thank you." ~ Albus Dumbledore
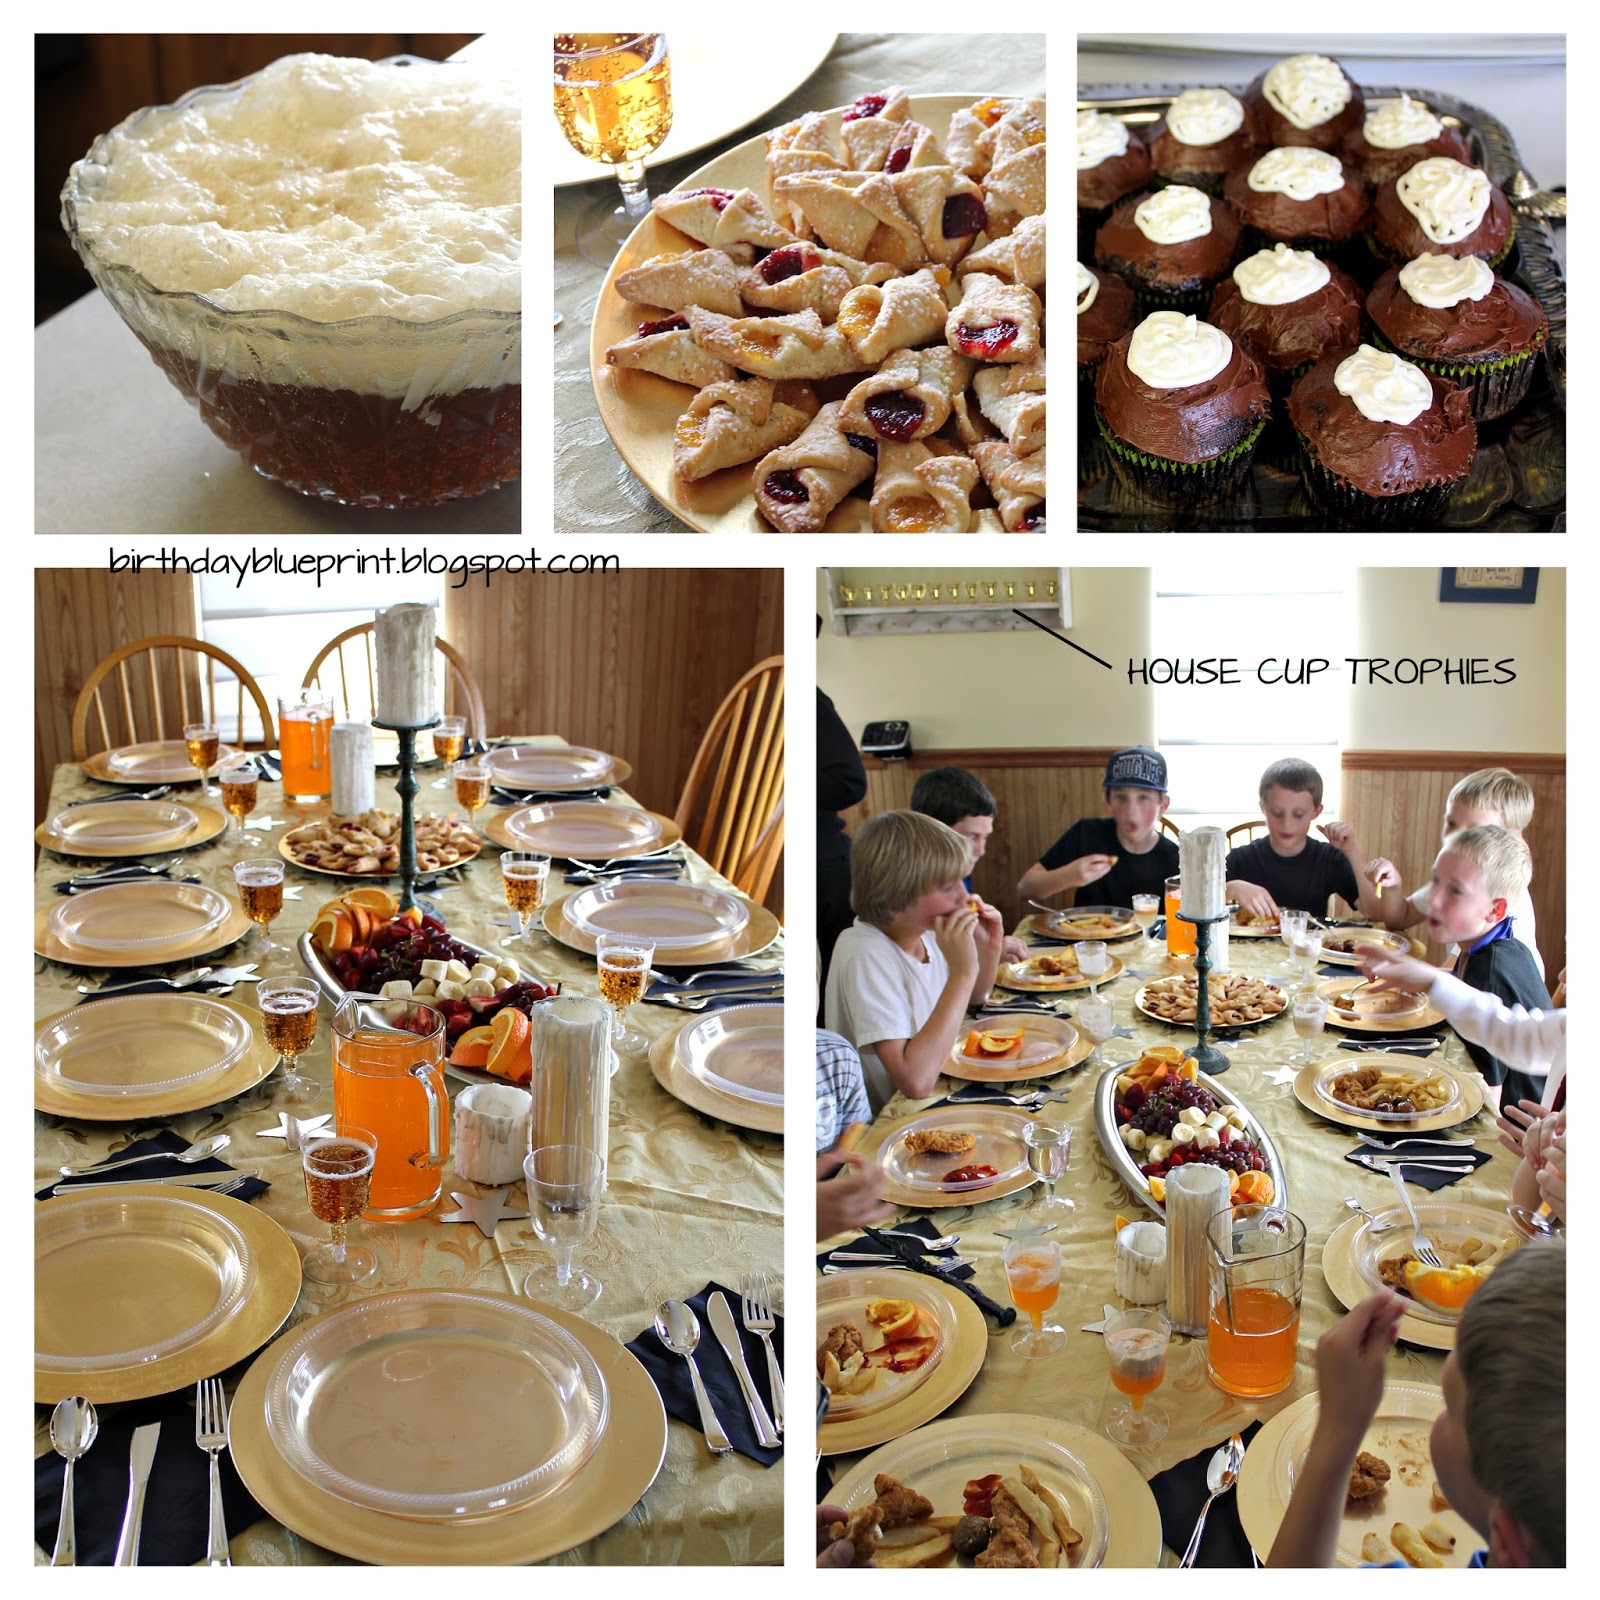
Here's our re-creation of the Great Hall banquet tables. I put clear plastic plates on gold chargers and the fancy silverware is actually plastic and purchased at the dollar store, as were the clear goblets. The house elves served chicken fingers, French fries, pumpkin juice (orange soda), butter beer (search online for a recipe - ours was just okay), a fruit platter, and fruit pasties. Don't laugh at my cupcakes please! They were supposed to be cauldron cakes, but I saved them for the last minute, so they didn't get their handles and were just a mess. Boys don't care! You can see the House Cup trophies on the shelf in the photo, and I made the drippy candles by dripping hot wax onto the edge of large pillar candles.

ACTIVITIES:

"Curious...very curious..." ~ Ollivander


"Not Slytherin, not Slytherin." ~ Harry Potter
After picking up their supplies from Gringotts Bank (shown in decor photo) and their textbooks from Flourish and Blotts, and wands from Ollivander's wand shoppe, the students proceeded to the sorting ceremony. My friend dressed as Professor McGonagall and proceeded to place the Sorting Hat on the heads of each child to be sorting into either Gryffindor or Ravenclaw by drawing a patch from a bucket. They then pinned on their patches (printed on card stock) and received their house scarves. I made the scarves from fleece, so they were quick and easy to sew together.

"You're saying it wrong. It's Wing-gar-dium Levi-o-sa, make the "gar" nice and long." ~ Hermione Granger
My daughter and her friend were the teachers for one house for Charms, Ancient Runes and Transfiguration classes while my husband and I taught Potions class upstairs to the other house, and then we switched. Downstairs they worked on proper spell pronunciation and wand movements in Charms class and tried to levitate a feather. Then in Transfiguration lessons they attempted, without success, to turn a rat into a chalice. For their O.W.L.'s tests they used their quills to properly identify the people of the world of Harry Potter, deciphered ancient runes, and tried to answer trivia. I've included the scripts the teachers used for their classes.

Font for photos is named: Harry Potter and the Dingbats


"I can teach you how to bottle fame, brew glory, even put a stopper in death..." ~ Professor Snape
Some of the potions I had made previously to use as Halloween decorations, but we started saving up small glass bottles, and purchased a few new ones to make many, many more ingredients for potions. All of the ingredients were edible since the boys would be using them to create their own concoctions to drink. I'll list some of the foods/spices for ideas. Don't use anything that will make them sick, and make sure they don't have any allergies!!! Some (or all) of the combinations of ingredients sound pretty gross, but in small amounts they were all safe to be eaten. Encourage the kids to use no more than a small amount of each to avoid an explosion!

Liquids to use as a base: olive oil, pomegranate juice, sweetened colored water, karo syrup, colored water, fruit juice, vinegar, and pickle juice. Flaky things: shredded coconut, quick rolled oats, onion skins, dill weed, dried apples, dried carrots, dried peppers, dried minced onion, edible glitter. Chunky stuff: cocktail onions, candy sprinkles, caraway seeds, black licorice, decorating candies, poppy seeds, sea salt, and coarse sugar. Powders: cinnamon, decorators sugar, powdered sugar, baking soda, and all sorts of spices.

"Ooh, you look much tastier than Crabbe and Goyle, Harry," said Hermione.
I recommend at least 10ml to 20ml bottles to make the potions in, but I wouldn't go bigger than 20ml because you don't want them drinking enough to make them sick if they load it with grossness! I think that these Glass Bottles with Corks are a great size because they have a wider mouth opening for adding ingredients, especially chunky ones like the cocktail onions.
And even though it was entirely up to them, every single boy decided to drink the potion they made!
Look in the handbooks (linked above) or click to go to the Harry Potter Wiki page to learn what to name your ingredients for cool potions to create, like Polyjuice Potion!

"There will be no foolish wand-waving or silly incantations in this class." ~ Professor Snape
Stirring sticks and black bowls (salsa bowls) to mix our potions in were purchased at the dollar store.  The glass bottles with corks were purchased at Michael's craft store. The colorful vials were found at a party store.


"Brutal, but no one's died in years." ~ Fred Weasley
I purchased hula hoops from the dollar store and we hooked them to pieces of re-bar on opposite ends for our Quidditch goal posts. The two houses played against each other, so this is where the scarves were important to identify the team members. We had different sized balls for the Quaffle, and Bludgers. I don't remember exactly how we played because it's been too long, but I do know that someone was the Golden Snitch, and I believe it was my oldest son because he's really hard to catch! You can look up rules for how to play Quidditch and create your own game.


"Oh, of course, you wouldn't know - Chocolate Frogs have cards inside of them, you know, to collect..." ~ Ron Weasley

I found a free printable for the chocolate frogs box here. In Photoshop I made them a little more blue instead of the purple the printable had because that's how they looked to me in the movie. I found a printable for a Dumbledore Wizard Trading card,and then made one for Harry and Voldemort in Photoshop for a little more variety. This website has some great trading card ideas. My friend had a chocolate mold for the frogs and made them for me with melting chocolate. The boxes took quite a while to assemble, but they turned out looking great.


Here's the link for the Bertie Bott's boxes. I printed them on white cardstock and used baker's twine to tie up the tops. Let's face it. Gross flavored jelly beans are just - gross!  But we did want to have some in the boxes. So I bought a few boxes of the the gross ones and mixed about 5 of them in each of the boxes which had placed Jelly Belly jelly beans in bags.

For the Golden Snitches I used Ferrero Rocher chocolates and cut wings out of vellum paper to give them a semi-transparent quality.

Here are a few of the sweets signs I made for the party.


For Harry Potter fans, the excitement will always be worth the effort. Have fun planning!

"He'll be famous — a legend — I wouldn't be surprised if today was known as Harry Potter day in the future — there will be books written about Harry — every child in our world will know his name!"—Professor McGonagall

July 20, 2014

Lego Party

THEME:
My son is a HUGE Lego fanatic.  Our whole family is actually - probably me most of all!  So the LEGO theme party was one we have been thinking of for years.  With the release of the LEGO MOVIE this year, it was sure to be AWESOME!  A huge bonus is that there are TONS of Lego-themed birthday parties out there for inspiration.  I used many of them for my son's party.  I'll include the links below with whatever I can, but take a peek at my LEGO board on Pinterest for even more ideas - or simply do a search.  One of the biggest problems I found with many of the other Lego Party ideas was that they were planned for much younger kids.  My son was turning 11, and didn't want "baby games".  :)

INVITATIONS:
We used a pre-designed freebie from this website for the invitation with the font IMPACT for the words.  It's adorable, free, and fit well with the "building" theme that we had planned for the party.  We got them printed as 4x6 photos.

DECORATIONS:
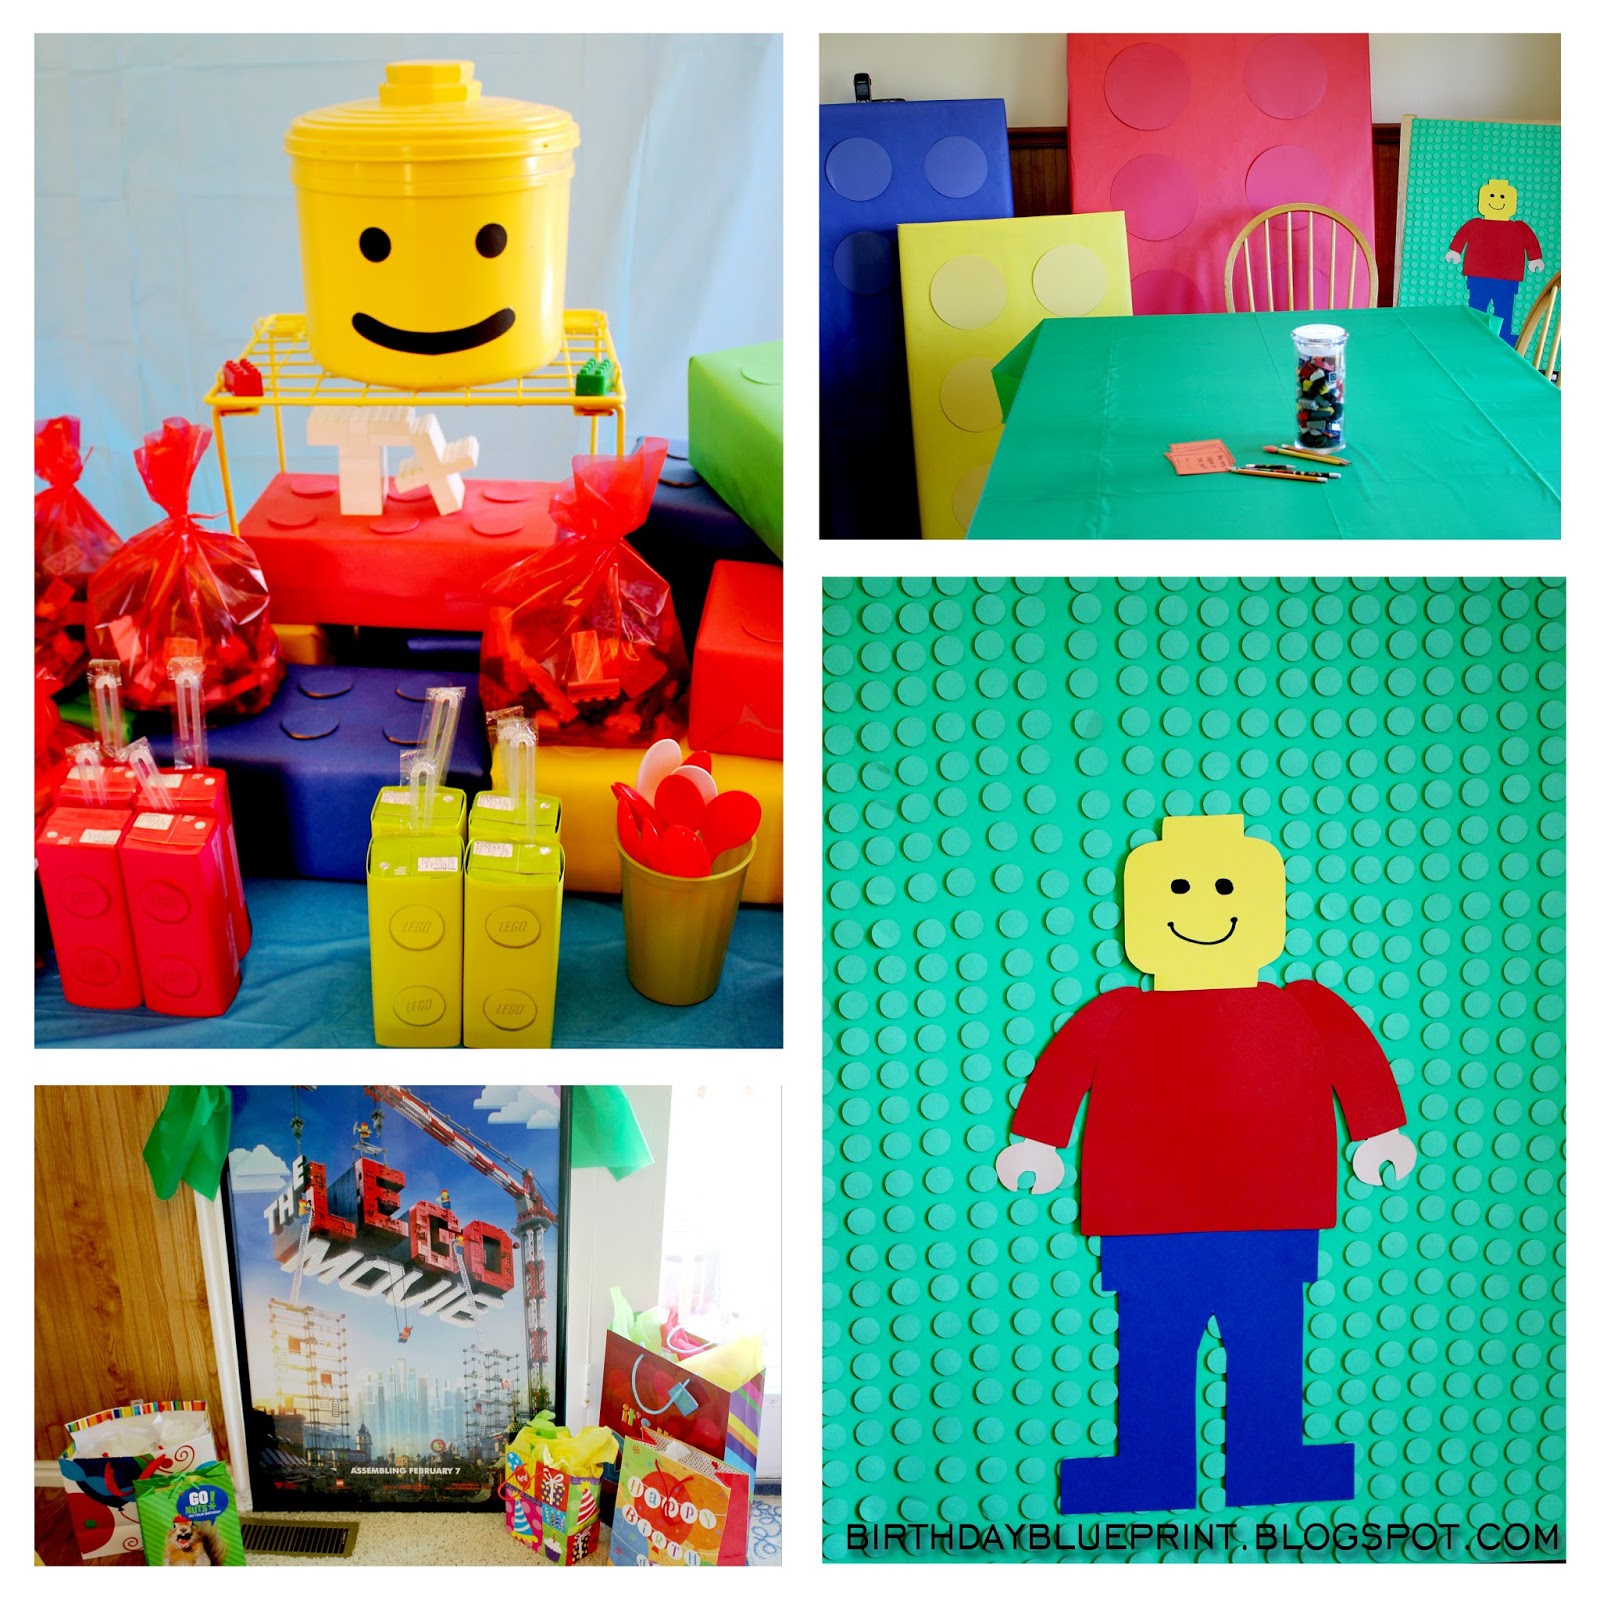
My daughter worked at a movie theater and got a LEGO MOVIE poster that we had framed for Evan.  It will go in his new Lego-themed bedroom, but we used it as decor for the party first.

Top right-clockwise: Giant Lego boxes wrapped with colored butcher paper. Pin the Head on the Lego Man board. Framed Lego Movie poster. Small Lego boxes and Lego Valentine's box.

Thanks to my AWESOME friend who had just had a Lego party for her son, I didn't make ANY of this decor!!  She had wrapped large boxes with colored butcher paper that we propped against the wall at one end of the dining room.  I don't know how long it took her to put all of those circles onto the green poster board with foam dots!  Really, that is something not even I would do ;)  But is super cute for a PIN THE HEAD ON THE LEGO MAN GAME.  She had also made about 10 heads to use, but my son thought this game was too young for his party, so we used it as a decoration instead.  For the food table I used my son's locker shelf to support the LEGO VALENTINE'S BOX that we made in this post out of a Red Vines licorice container.  She also made about 15 of the small Lego blocks out of Capri-Sun boxes.  We stacked them all around the food table.  After this party we used all of these decorations at my work for a party and then to a friend for parties for her two sons.  So they've been used for 5 parties and counting!!  Her hard work is MUCH appreciated!  Oh, and did you notice the Tt?  Only REAL Lego fans will understand.

MUSIC:
The LEGO MOVIE soundtrack of course!  I downloaded it off Amazon which is quick and easy. And I think you get 4 different versions of the EVERYTHING IS AWESOME song!!!  Just what you wanted - right?  Well, these boys wanted to hear the full version of the BATMAN song - and yes, it's on there.

ACTIVITIES:
This is where we struggled to find games appealing to 11 year-olds.  But what we came up with was SUPER FUN!

Guess How Many Legos:
Each boy got to put his name and #guess on a paper.  At the end when we gave out the awards we gave the ESTIMATOR AWARD to the boy with the closest guess.

Lego People Race:
This game, as far as I know, is my original idea, and it turned out really well.The prep for this game was really fun for my son.  I had him build 50 Lego people with random hair, clothing, accessories.  Anything he wanted to build, any character. Yes, 50!  We have a lot of Legos so this wasn't a problem.  But if you didn't have that many, you could build simple objects also and play the game the same way.

My daughter took individual photos of each of them, then we pulled them all apart.  We didn't remove hands and arms - that's just cruel.  I took the photos and printed out 9/page like this on thick photo paper.
Lego People Race game cards. No Printable here. You have to make your own to match your Legos!

Then we cut them apart to make game cards.  I had my son decide how many points each character was worth depending on how many accessories they had, or things like how detailed their clothing was.  I didn't take the time to print them on the cards, we just wrote the points in the upper corner with a Sharpie pen.  They varied from 2 to 5 points.  I handed each boy a card face down and on my count they turned their card over and started assembling.  As soon as they completed one person they could move on to the next until all the cards were taken.
It was a mad grab for parts to assemble their Lego people.
Construction Games:
We filled Lego Grab Bags full of random Legos for each boy.  After picking one they got a large plate to keep them on and we started a series of timed individual building activities.  They got to use the people they built in the previous game as part of their building parts.
The Lego grab bags to build with.

They were given an object to build and about 3 minutes to do each one using only the Legos from their bag.  We did BEST HOUSE, TALLEST TOWER, and LONGEST BRIDGE.
The boys showing off their bridge building skills.

Working on their "Amusement Parks" for the group build.

Then they were paired in two teams for some group scene building on a base plate.  The first challenge was to build an AMUSEMENT PARK and describe it to me, and after mixing up teams a little, the next scene was to build a CASTLE.  The boys got about 7 minutes to start with, but kept asking for more time so I think on each one we spent around 12 minutes.

The last construction game we did was a ROCKET SHIP.  But after each boy had about 1 minute to start building, then they had to pass it to the left, build on the next one, and pass it after about 30 seconds.  The boys got really goofy with this one, so they were very interesting rockets, but they had a great time.

Memory Game:
We had also prepared a base plate with 20 random Legos with distinct names on it for a MEMORY GAME, but we had it hidden in the other room so they wouldn't see it - so we forgot about it!  Oh well.  But they would have had 1 minute to study the Legos, then have to write down as many items as they could remember.

FOOD:
Square pizza with pepperoni (that didn't quite look like the photo on the website - shocker!), colored Jello in cups, juice boxes, and a fruit tray.  The juice boxes were made from a printable I found here.

CUPCAKES:
My friend loaned me her Building Bricks and Minifigure silicon molds to make the Legos and Lego men for these cupcakes.  I had never done melting chocolate before - and it was pretty fun!  In some ways easy, but a little tricky to get precise.  My best tool to fill in details was a plastic chopstick!  And even though I pushed chocolate down into each Lego bump, they still didn't come out perfect.  But were still super cute!  The faces were drawn with Wilton Edible Markers.

FAVORS:
As the boys played the construction games I wrote down who I was going to give what award to.  The awards were bags of freezer pops, candy bars and Lego pencil sharpeners that I got from Dollar Tree.  The awards we gave were for ESTIMATOR, DESIGN, SPEED, CREATIVITY, RESOURCEFUL, ENGINEER, ARCHITECT, STRUCTURAL, and CARPENTER.  But you could come up with whatever fit your party.  The fonts I used for the tags were called Lego Thick, and Lego Brix - both downloaded online for free.

We also gave them a bag of block candies that I bought in the bulk candy section of WinCo grocery store, or you can find them on Amazon here.

The Lego Movie wasn't released on DVD yet when we had my son's party, or we would have made it a little longer and watched the movie at the end.  The boys had a great time, and my son thought EVERYTHING WAS AWESOME!

September 3, 2012

Space Party

My son Evan's space party for his 8th birthday was a real BLAST!

Theme:

I would have to say that the inspiration for this party came from two things.  1 - we own a rocket launcher, and 2 - my husband works for a company that designs stuff for NASA.  Access to space stuff was great motivation.  And as I have said before, I can talk up any party idea enough to make my kids fall in love with my ideas :)  They truly never mind, and always love what I come up with.

The majority of the details and activities came from this amazing party on Life Frosting.  So I give her the credit for coming up with all of the great ideas.  She has WONDERFUL parties posted, so check them out sometime.

Invitations:

I saw many cute invitations as I was searching for ideas on all of my favorite party sites, but just wasn't finding the perfect idea.  While browsing space wallpapers I found this photo from NASA and got the idea for these invites with my little astronaut as the star!
Front and Back.
I took a photo of my son's face, and using Photoshop Elements, I combined the two (adjust the layer opacity of the face) and made him a space walker!  For the back I just Photoshopped out the guy and added the text.  The wording came exactly from the invites on Life Frosting, so check out the link above.  The font was called fixedsys.  I tried to find the link for the photo, but can't find the exact one.  It's a pretty common photo though, so if you do a Google search for Manned Maneuvering Unit you should find it pretty easy.

Activities:

As kids showed up, we started them with Weightless Practice by doing Anti-gravity Arms.  Have you done this before?  I used to do it all the time as a kid.  You hold your arms straight down at your sides and push up as hard as you can.  While doing this, someone is holding your arms down at your sides.  Do this for about a minute, then have them let go and relax your arms. Your arms will float up in the air by themselves!
Top left, clockwise: Anti-gravity Arms, Target Practice, Nuts, bolts and washers for Shuttle Repair Relay.
Then the kids lined up to do target practice with a UFO (Frisbee) and foam Rocket (my son is holding it) through a hula hoop tied to our trampoline.  I got the Frisbee and rocket at Target.

For the Shuttle Repair Relay I explained to the kids how astronauts train for missions under water in their space suits.  We tried to simulate this by putting two washers on a bolt, then screwing on the nut while wearing dish gloves underwater.  I filled two plastic tubs about 6 inches deep and we divided into two teams and raced to see what team could finish first.  I had four sets of nuts, bolts and washers (from Home Depot - the square ones are in the cement section) so that when a boy finished we would take out a completed one and drop in the loose parts for the next boy to start on.  It was pretty tricky, especially for the younger boys, and took quite a while to complete.  I should have had something for the kids waiting, or those finished, to do when it wasn't their turn - like find a "Moon Rock" (we had already done it).
"Moon Rocks" made for Starbursts and tin foil.
Moon Rocks were made ahead of time and hidden around the yard.  Each boy got to find one and then put it in their treat bag.  Yes, they look like baked potatoes, but are a big handful of Starburst candies wrapped in tin foil.
Thanks to ATK Space Systems for loaning the demo video and composite parts.  And free coloring books also!
As I mentioned before, my husband works for a company that makes parts for aerospace companies including NASA.  That company is ATK and they make the booster rockets for the space shuttle, among other things. My husband talked to his boss, and they were able to let him check out a video and some composite parts.  He did a short demo for the kids and we watched some of the video that showed a shuttle launch, jets taking off, etc.  They thought it was pretty cool - and it was!

We actually did the rocket launching at the very end of the party because their parents had to drag them away!  Literally. Each kid got to make and decorate their own rocket.  If I would have had time I would have just made the rockets ahead of time, had them decorate with stickers and markers, then launch.  So the actual construction took a little time, but they still enjoyed it.  But the best part by far is launching their little rockets about a hundred feet into the air.  They had fun trying to catch them too.
Rocket launching!  The highlight of the party!
For plans on how to make a PVC rocket launcher go here for one similar to ours, or just do a Google search.  There are many different ways to make them.  We make our rockets by rolling a piece of cardstock around a piece of PVC pipe that is just bigger than the one we launch off of (3/4 inch on launcher, 1 inch to roll on).  Tape it well with clear packing tape along the entire seam.  Tape over one end of the tube well and make sure it is sealed.  This will be the cone end.  If you don't tape over the end, air will get through and the cone will blow off.

Cut a 3" circle of cardstock for the nose cone (I just trace around the inside of the tape roll).  Cut a line from the edge to the center, then roll it into a cone and tape.  Tape it to the top of the tube.
Rocket fin pattern.  Print on 8 1/2" x 11" cardstock and follow insturctions on where to cut.

Tape three fins to the bottom of the tube like in the photo above, and then decorate and launch!
I hope the directions make sense.  Looking at the photo will probably help the most.

Music:

Years ago I helped do a space themed Blue and Gold Banquet for the Cub Scouts in our area.  I ordered this album for it, The Science Fiction Album - City of Prague Philharmonic (4 disks), and have actually used songs from it for other events, like a haunted house, and an alien themed Halloween party.  Songs from 2001: A Space Odyssey, E.T., Close Encounters, and Star Trek made great background music, not to mention Star Wars of course.  I highly recommend this great album.  Actually listening to it as I do this post.

Food:

We tried to keep the food pretty simple for picky 8 year-olds.  We had "Flying Saucer" pizzas, "Asteroid" cheese puffs, "Meteorite" grapes, and "Galaxy Juice" drinks.
The space food and display table.
I made the star ice cubes from unsweetened colored Kool-Aid in my star ice cube trays.  I should have sweetened them!!  They were okay with the "Galaxy Juice" sprite from 2-liter bottles poured over, but when they got smaller and people started popping them into their mouths to suck on they got a very tart surprise!  Kool-Aid has a lot of citric acid in it.  They did make the Sprite interesting colors though.  The label is clip-art from Microsoft Publisher.

The backdrop was made from a black plastic tablecloth and wall decals from the local Dollar Tree store.  I also got the space shuttle die cuts there.  Boxes were placed underneath the plastic to add levels and height.

The table was close to the same with the addition of silver star die-cuts from Zurcher's party store.  We had silver cups and plates.

Cake:

I got the idea for the cake from the Family Fun crater cake.  I didn't want to take time to serve up the cake at the party, so I made patriotic cupcakes to go with it.  I was excited to find the space playset at our local party store Fundaze.  I may have squealed with delight!  It came with the rocket ship, flag and space men.  I think I got the number 8 sparkly candle either there also, or at Zurcher's party store.
Space backdrop and Moon Cake.
The cake was a chocolate cake mix baked in a stainless steel bowl.  I used canned frosting with crushed Oreo cookies mixed in.  The craters were made with gray Necco candy wafers.  I suggest buying several packs to get plenty of gray ones that aren't broken.  The only store I found them at was also Dollar Tree.  Love that place.

Favors:

The favor bags consisted of Mars Bar, Orbit gum, Milky Way candy bars, Starburst Moon Rocks, Pop Rocks, glow sticks, squirt gun, airplane finger flyer, patriotic bendy straw and Tootsie rolls, parachute dude,  an ATK coloring and activity book, and a completion certificate.  My husband got the activity books from the HR department at work and they were awesome.  They had puzzles, space facts, and full-color paper airplane pages to fold.  He also ordered some space erasers and dehydrated space food through work (the actual stuff they send up with the astronauts) but it didn't make it in time for the party.  We used it at a family party a month later.
The treat bags with Space Shuttle die-cuts for name tags.
Completion certificates we put in the treat bags.
At the time of this party NASA was doing a fun "Send Your Name to Mars" program on their kid's website.  You could register and get your name on a computer microchip that would be sent to Mars on the rover Curiosity.  I entered my son's name and printed him a certificate telling about it.  Well, this rover just landed on Aug. 5, 2012 and my son thinks it is pretty cool that his name is now on Mars!  You can see how it landed here.

Other Parties to Visit:

Need more ideas?  There's a fun Robot Command game at Birthday in a Box, and don't forget to visit Life Frosting where I got my inspiration for this party.

Good luck planning your own space voyage, and don't forget to leave comments or e-mail me with questions.  I LOVE COMMENTS!  If you use any of my ideas, please let me know in a comment.

June 20, 2012

Mad Scientist Party

Theme:
I would have to say that the inspiration for this party came from cool Halloween supplies on clearance at Walmart!  I'll show it to you later in the treat bags, but since Halloween is about six months before my son's birthday, he had to decide quickly.  Since I am pretty good at persuading my children toward the party I want to plan, it wasn't hard to convince him :)  They do actually get a choice, but once I tell them all of the cool ideas I have for that theme, they jump on board quickly.

This was a fun party to plan, but got a little pricey from all of the specialized supplies I purchased for it.  Compared to some I found, I think I actually kept it pretty cheap.  But with 6 months to plan, I accumulated quite a few items.  But the results were a really cool party.  And just to prove it, I will quote a boy who attended that came up to me and said, "I just have to tell you, this is the coolest birthday party I have ever been to!"  I love that kid.

Invitations:
I found these awesome invitations that I used at Living Lucurto (her party linked here).  Here's the link for the cute OPEN WITH CAUTION stickers used to seal them with.  I love it when talented people share awesome freebies!  Forgot to take a photo!  Click on the link to see hers that I used.

Decorations:
The color scheme came from the invitations and the supplies that I had, and this cool Hazardous Teen Party on Catch My Party.

 Test tube sprinkles were from Halloween clearance items at Walmart.

Halloween decor and dry ice in colored water added to our mad decor. The background science die-cuts were from Dollar Tree.

We bought dry ice to add to the colored water for a cool effect, but it just doesn't last very long!  Long enough to take a few photos, but not through the party.  It would take a big chunk of dry ice to get a long-lasting effect.  We put a little more in when the kids came in to eat so they could see it.

Activities:
Safety goggles from Dollar Tree.

We had the caution sign (below) posted on the front door as the kids showed up.  My daughter drew the "Get your Einstein on!" sign on the white board that was in the entry.  She helped them get their lab coat on, safety glasses, then if they wanted, she used hair mousse to get their hair spikey.  A few kids even let her do it!
The lab coats were made from a white garbage bag and a Sharpie marker.  We cut holes for their head and arms.  Here's a cute idea for one out of a white T-shirt, but we were going for waterproof.


Building their atom structures.

After the boys got dressed for mess, they headed outside and were given a bag of gumdrops and toothpicks to build an Atom structure.  We told them to make it as tall and as stable as they could.  They came up with some pretty neat towers.  I got the idea from here at Party Planning Mom, but I think the gumdrops we used were more stable than marshmallows.  The link will take you to her entire party, which is very inspiring.  Many of my ideas came from her party.
My husband and my oldest son were our scientists that demonstrated and helped run the experiments. I kept calling my son Beaker, but since he had never see The Muppets, he didn't get it :)

I had my very own Beaker and Bunsen!

The jelly marbles were purchased from Steve Spangler Science.  If you watch the videos on his website you can get lots of ideas for experiments to do with the supplies.  When they show up, they also come with a sheet of directions and experiments which was really helpful.

Jelly marbles are solid polymer orbs that start out the size of a small bead.  They expand to a squishy marble size as they absorb water.   The first photo is of marbles that we soaked for at least a day in colored water, yellow and blue.  The middle photo shows how they disappear when you add water to the container.  We had a message taped on behind it that said "Happy Birthday Noah" and was revealed when the water went in, but you can't see it in the photo.  The third photo shows how the clear ones are practically invisible in water.  The kids loved putting their hand in this and feeling them.  They were given some dry jelly marbles in their treat bags to take home and "grow".

We tried to dry them out afterward, but after being handled and played with, they got moldy before they shrunk, and we threw them away.

Hydrophobic sand or "Magic Sand".
Hydrophobic sand is SO much fun to play with!  When it is in the air it looks and feels just like regular sand, but when it is under water it gets 'scared' of the water (hydrophobic) and clumps together.  You can shape it and lift it under water, but as soon as you get into the air it falls apart.  My husband explained how it works and then the kids got to take turns playing with it.

I was able to spread it out to dry after the party to store back in a bag.  Spread it thinly though because little drops of water kept hiding in it.


I tried to make everything sound as scientific as I could, so the above supplies are white vinegar and baking soda.  In the recipe below there are scientific (or scientific-sounding) names you could label them with.  Most of the kids were pretty smart and knew what they were.

Top three photos are the volcanoes. Bottom two are Insta Snow.

I knew we wanted to do the old erupting volcano experiment, but I wasn't sure how.  Somewhere I stumbled across this easy way to make a volcano out of a Dixie cup, small plate and foil.  Just tape the cup to the center of the plate, put a piece of tin foil over it and tape to the bottom, then cut slits in the top of the cup and tape them to the inside.  It was an easy and inexpensive way to make 12 volcanoes.

Volcano Recipe (for a small Dixie cup)
1 Tbsp. baking soda (sodium bicarbonate)
2 Tbsp. water (H2O)
drop or two of food color (Blue No. 1, Red No. 40)
1 drop of dish soap (sodium laureth sulfate, or anionic surficant)
     Mix together with a popsicle stick (stirring stick).  Then take to eruption site before adding:
2 Tbsp. vinegar (acetic acid)
     Pour it in quickly!

I experimented with a lot of different recipes, but loved it this way with the dish soap.  Without it the bubbles pop and go away quickly, but with it, it foams and oozes over the edges slower for a longer-lasting effect.  Always try it out ahead of time to make sure it works well with the size of cup you have.  It wouldn't be any fun if it didn't overflow!

The bottom two photos (above) are of the Insta Snow, which was also purchased from Steve Spangler Science.  This powder is a super absorbent polymer that grows in seconds when you add the water.  Again, watch the videos on his site to see how cool it is.  We had the kids team up for this one and after watching it grow in the cup they got to dump it out onto large cookie sheets and play with it.  We didn't send any of this home because it could be a big mess if not controlled.
The next experiment was to make Oobleck, a non-newtonian fluid.  This basically means that when stress is applied to this liquid it exhibits properties of a solid, and it's totally cool to play with!  I got the little storage containers at the dollar store, which is a great place to get them because I think they come in a six pack for a dollar, and they have all different sizes.


Oobleck Recipe
1 part water
1.5 to 2 parts cornstarch
food coloring (optional)

Try it ahead of time to get the right consistency.  I think we used a straight 1:2 ratio.  The kids got to take this home in their containers, but because of the dirt and oil on your hands, it goes moldy quickly.  You could try storing it in the fridge, or just make a new batch.

Tip:  I bought the baking soda and cornstarch from a store that sells these items in bulk bins and it made it much cheaper.  I went to WinCo Foods.

And what party would be complete without Mentos and Diet-Coke geysers!!!
The highlight of the party! Saved for the end because the kids were a MESS afterward!

We purchased the Geyser Tube from Steve Spangler also, and you really couldn't do this as well without it.  The best effect comes by getting all of the Mentos into the Diet Coke at once, and the pull-pin makes that possible.  My husband made a little stand out of some scrap wood to keep the bottle from tipping, and each guest got a pack of plain mint Mentos (they got to decide how many to add), and a 2-liter bottle of Diet Coke.  We rinsed out the tube between launches to keep it from reacting too soon.

Off brands of soda will work also, but I got this on sale for the same price.  My family hardly ever drinks soda, and we don't drink Coke at all, so I felt SO guilty with a shopping cart full of twelve 2-liter bottles!  I told everyone I talked to that it was for Mentos and Diet Coke geysers because I didn't want them to think I was going to drink it!

Most of the kids actually kept their lab coats on, and only a few chose to stand in the geysers, but for this reason, go with Diet Coke instead of regular to reduce the sticky mess.  Nothing you can do about the smell though, because those kids were REALLY stinky afterward!

Food:
The food was simple, but fun.  I saw some Jello made in petri dishes with a gummy worm, but didn't want the added expense, so I used clear cups instead, and I think they turned out great.  I let them set up just a little before adding the gummy worms.  We did four flavors of jello.  The main dish was hotdogs, and the drinks were mini cans of 7-UP with the label below.  Again, thanks to this post for the inspiration.  The atom structures the kids made were a great centerpiece, and I filled my big cookie jar full of atomic cheese balls.
Cake & Cupcakes:

I purchased this gummy brain on Halloween clearance at Walmart, and it made an awesome cake topper!  The container was from some rolls or something that we had just purchased their also.  The icing is tinted slightly grayish, and it was easy to do a brain design on the top of the cupcakes with a large round tip.  I totally LOVE how they turned out.  I was going to tint some vanilla pudding green to put as filling in the cupcakes, but I didn't have time.

Favors:

The treat bags were: skull suckers, prisms, wax drink things, and paddle/balls from Halloween clearance items from Walmart, Toxic Waste candies, bubbles, glow sticks, Sour Dudes Sour Straws and grow capsules from Dollar Tree, Smarties and Atomic FireBall candies, and polymer orbs from Steve Spangler Science (link above).  Nerd candies would also be a great addition.


The bubbles from Dollar Tree turned out really cute.  I struggled to come up with a scientific name for them, and eventually made this one up on my own.  I'm pretty proud of it!
It was a very fun party to plan.  A little time-consuming to come up with the experiments, but worth it.  It was also great doing something that felt a little educational also.  Helps me justify the cost! :)


Please leave comments with questions or additional party ideas.
I'd love to hear from you!
Click here to download the printable files I made.
Extras:
  • The font I used for the labels was Aharoni.
  • The label images were from various clip-art I found on Google Images, and the font Science which is a bunch of science dingbats.  Available free on dafont.com.
  • Funology is a site with great information and science experiments.
  • Birthday Party Ideas.com has this great party posted under the name Scientific Sleepover 8 yr.