Showing posts with label birthday. Show all posts

February 17, 2019

Captain America Party

THEME:
We are big Marvel fans, and lucky that the movies always seem to release near my two youngest son's birthdays! Movie parties are great for teens because it's not as hard to keep track of a group of kids at that age. And even if friends have already seen the movie, they most likely won't mind seeing an action-packed hero movie again!

INVITATION:
I searched for movie poster images on the internet for images for the invites, especially the famous shield icon that so many other elements of our party were based on. Under the text details I used a photo with texture to age the background and used metallic colors for the text.

FOOD:
Captain America's shield was the inspiration for the party food. I made a fruit tray with strawberries, blackberries and bananas on a round tray from the dollar store. The fruit dip was placed in a glass star dish also from Dollar Tree. Here's a link to the recipe for the yummy fruit dip!

The pizzas were on a homemade crust with cheese and rings of pepperoni and a center of sliced olives. I used a star shaped cookie cutter to cut a slice of white cheese for the center.
DECOR:
I kept the decor simple since we weren't going to be home longer than just to eat. So in April I pulled out a bit of my red, white and blue 4th of July items for a centerpiece.

CAKE:
I used a red velvet cake mix for the two red layers and a white cake mix divided for one white layer and one blue layer tinted with food coloring. After a base coat of the white icing I use different plates, lids and a star cookie cutter to make lines on the top of the cake before I filled in with a star tip in a piping bag. I used our favorite Duncan Heinz cream cheese canned icing so the white wasn't a bright white, but it tasted great!
I love the fact that this was a theme party, but without a lot of expense or fuss. By just using three colors and the shield for inspiration it all tied together to make a fun party for a new teen!

Oh, and Captain America is my favorite Marvel hero, so I really enjoyed this party too. ;)

June 20, 2012

Mad Scientist Party

Theme:
I would have to say that the inspiration for this party came from cool Halloween supplies on clearance at Walmart!  I'll show it to you later in the treat bags, but since Halloween is about six months before my son's birthday, he had to decide quickly.  Since I am pretty good at persuading my children toward the party I want to plan, it wasn't hard to convince him :)  They do actually get a choice, but once I tell them all of the cool ideas I have for that theme, they jump on board quickly.

This was a fun party to plan, but got a little pricey from all of the specialized supplies I purchased for it.  Compared to some I found, I think I actually kept it pretty cheap.  But with 6 months to plan, I accumulated quite a few items.  But the results were a really cool party.  And just to prove it, I will quote a boy who attended that came up to me and said, "I just have to tell you, this is the coolest birthday party I have ever been to!"  I love that kid.

Invitations:
I found these awesome invitations that I used at Living Lucurto (her party linked here).  Here's the link for the cute OPEN WITH CAUTION stickers used to seal them with.  I love it when talented people share awesome freebies!  Forgot to take a photo!  Click on the link to see hers that I used.

Decorations:
The color scheme came from the invitations and the supplies that I had, and this cool Hazardous Teen Party on Catch My Party.

 Test tube sprinkles were from Halloween clearance items at Walmart.

Halloween decor and dry ice in colored water added to our mad decor. The background science die-cuts were from Dollar Tree.

We bought dry ice to add to the colored water for a cool effect, but it just doesn't last very long!  Long enough to take a few photos, but not through the party.  It would take a big chunk of dry ice to get a long-lasting effect.  We put a little more in when the kids came in to eat so they could see it.

Activities:
Safety goggles from Dollar Tree.

We had the caution sign (below) posted on the front door as the kids showed up.  My daughter drew the "Get your Einstein on!" sign on the white board that was in the entry.  She helped them get their lab coat on, safety glasses, then if they wanted, she used hair mousse to get their hair spikey.  A few kids even let her do it!
The lab coats were made from a white garbage bag and a Sharpie marker.  We cut holes for their head and arms.  Here's a cute idea for one out of a white T-shirt, but we were going for waterproof.


Building their atom structures.

After the boys got dressed for mess, they headed outside and were given a bag of gumdrops and toothpicks to build an Atom structure.  We told them to make it as tall and as stable as they could.  They came up with some pretty neat towers.  I got the idea from here at Party Planning Mom, but I think the gumdrops we used were more stable than marshmallows.  The link will take you to her entire party, which is very inspiring.  Many of my ideas came from her party.
My husband and my oldest son were our scientists that demonstrated and helped run the experiments. I kept calling my son Beaker, but since he had never see The Muppets, he didn't get it :)

I had my very own Beaker and Bunsen!

The jelly marbles were purchased from Steve Spangler Science.  If you watch the videos on his website you can get lots of ideas for experiments to do with the supplies.  When they show up, they also come with a sheet of directions and experiments which was really helpful.

Jelly marbles are solid polymer orbs that start out the size of a small bead.  They expand to a squishy marble size as they absorb water.   The first photo is of marbles that we soaked for at least a day in colored water, yellow and blue.  The middle photo shows how they disappear when you add water to the container.  We had a message taped on behind it that said "Happy Birthday Noah" and was revealed when the water went in, but you can't see it in the photo.  The third photo shows how the clear ones are practically invisible in water.  The kids loved putting their hand in this and feeling them.  They were given some dry jelly marbles in their treat bags to take home and "grow".

We tried to dry them out afterward, but after being handled and played with, they got moldy before they shrunk, and we threw them away.

Hydrophobic sand or "Magic Sand".
Hydrophobic sand is SO much fun to play with!  When it is in the air it looks and feels just like regular sand, but when it is under water it gets 'scared' of the water (hydrophobic) and clumps together.  You can shape it and lift it under water, but as soon as you get into the air it falls apart.  My husband explained how it works and then the kids got to take turns playing with it.

I was able to spread it out to dry after the party to store back in a bag.  Spread it thinly though because little drops of water kept hiding in it.


I tried to make everything sound as scientific as I could, so the above supplies are white vinegar and baking soda.  In the recipe below there are scientific (or scientific-sounding) names you could label them with.  Most of the kids were pretty smart and knew what they were.

Top three photos are the volcanoes. Bottom two are Insta Snow.

I knew we wanted to do the old erupting volcano experiment, but I wasn't sure how.  Somewhere I stumbled across this easy way to make a volcano out of a Dixie cup, small plate and foil.  Just tape the cup to the center of the plate, put a piece of tin foil over it and tape to the bottom, then cut slits in the top of the cup and tape them to the inside.  It was an easy and inexpensive way to make 12 volcanoes.

Volcano Recipe (for a small Dixie cup)
1 Tbsp. baking soda (sodium bicarbonate)
2 Tbsp. water (H2O)
drop or two of food color (Blue No. 1, Red No. 40)
1 drop of dish soap (sodium laureth sulfate, or anionic surficant)
     Mix together with a popsicle stick (stirring stick).  Then take to eruption site before adding:
2 Tbsp. vinegar (acetic acid)
     Pour it in quickly!

I experimented with a lot of different recipes, but loved it this way with the dish soap.  Without it the bubbles pop and go away quickly, but with it, it foams and oozes over the edges slower for a longer-lasting effect.  Always try it out ahead of time to make sure it works well with the size of cup you have.  It wouldn't be any fun if it didn't overflow!

The bottom two photos (above) are of the Insta Snow, which was also purchased from Steve Spangler Science.  This powder is a super absorbent polymer that grows in seconds when you add the water.  Again, watch the videos on his site to see how cool it is.  We had the kids team up for this one and after watching it grow in the cup they got to dump it out onto large cookie sheets and play with it.  We didn't send any of this home because it could be a big mess if not controlled.
The next experiment was to make Oobleck, a non-newtonian fluid.  This basically means that when stress is applied to this liquid it exhibits properties of a solid, and it's totally cool to play with!  I got the little storage containers at the dollar store, which is a great place to get them because I think they come in a six pack for a dollar, and they have all different sizes.


Oobleck Recipe
1 part water
1.5 to 2 parts cornstarch
food coloring (optional)

Try it ahead of time to get the right consistency.  I think we used a straight 1:2 ratio.  The kids got to take this home in their containers, but because of the dirt and oil on your hands, it goes moldy quickly.  You could try storing it in the fridge, or just make a new batch.

Tip:  I bought the baking soda and cornstarch from a store that sells these items in bulk bins and it made it much cheaper.  I went to WinCo Foods.

And what party would be complete without Mentos and Diet-Coke geysers!!!
The highlight of the party! Saved for the end because the kids were a MESS afterward!

We purchased the Geyser Tube from Steve Spangler also, and you really couldn't do this as well without it.  The best effect comes by getting all of the Mentos into the Diet Coke at once, and the pull-pin makes that possible.  My husband made a little stand out of some scrap wood to keep the bottle from tipping, and each guest got a pack of plain mint Mentos (they got to decide how many to add), and a 2-liter bottle of Diet Coke.  We rinsed out the tube between launches to keep it from reacting too soon.

Off brands of soda will work also, but I got this on sale for the same price.  My family hardly ever drinks soda, and we don't drink Coke at all, so I felt SO guilty with a shopping cart full of twelve 2-liter bottles!  I told everyone I talked to that it was for Mentos and Diet Coke geysers because I didn't want them to think I was going to drink it!

Most of the kids actually kept their lab coats on, and only a few chose to stand in the geysers, but for this reason, go with Diet Coke instead of regular to reduce the sticky mess.  Nothing you can do about the smell though, because those kids were REALLY stinky afterward!

Food:
The food was simple, but fun.  I saw some Jello made in petri dishes with a gummy worm, but didn't want the added expense, so I used clear cups instead, and I think they turned out great.  I let them set up just a little before adding the gummy worms.  We did four flavors of jello.  The main dish was hotdogs, and the drinks were mini cans of 7-UP with the label below.  Again, thanks to this post for the inspiration.  The atom structures the kids made were a great centerpiece, and I filled my big cookie jar full of atomic cheese balls.
Cake & Cupcakes:

I purchased this gummy brain on Halloween clearance at Walmart, and it made an awesome cake topper!  The container was from some rolls or something that we had just purchased their also.  The icing is tinted slightly grayish, and it was easy to do a brain design on the top of the cupcakes with a large round tip.  I totally LOVE how they turned out.  I was going to tint some vanilla pudding green to put as filling in the cupcakes, but I didn't have time.

Favors:

The treat bags were: skull suckers, prisms, wax drink things, and paddle/balls from Halloween clearance items from Walmart, Toxic Waste candies, bubbles, glow sticks, Sour Dudes Sour Straws and grow capsules from Dollar Tree, Smarties and Atomic FireBall candies, and polymer orbs from Steve Spangler Science (link above).  Nerd candies would also be a great addition.


The bubbles from Dollar Tree turned out really cute.  I struggled to come up with a scientific name for them, and eventually made this one up on my own.  I'm pretty proud of it!
It was a very fun party to plan.  A little time-consuming to come up with the experiments, but worth it.  It was also great doing something that felt a little educational also.  Helps me justify the cost! :)


Please leave comments with questions or additional party ideas.
I'd love to hear from you!
Click here to download the printable files I made.
Extras:
  • The font I used for the labels was Aharoni.
  • The label images were from various clip-art I found on Google Images, and the font Science which is a bunch of science dingbats.  Available free on dafont.com.
  • Funology is a site with great information and science experiments.
  • Birthday Party Ideas.com has this great party posted under the name Scientific Sleepover 8 yr.

June 4, 2012

Angry Birds Party

As you can guess, my inspiration for this party came from the Angry Birds game.  I had it on my iPod, but it was too small to play well.  It wasn't until I played it on my computer on Google Chrome that I really got hooked.  This party was a great excuse to play it too - I was doing research!  That really is true though.  I needed to know what the characters and items did, and the best way to find out was to play.

I do need to add, that my son Evan, who the party was actually for (they are all kind of for me though :) is also a big Angry Birds fan.  It's a favorite for him to play on my husband's iPad.  So it wasn't hard to convince him that it was the perfect theme for his 9th birthday.

My thanks though, goes to Pinterest, where I got all of my ideas for the party.  You thought I came up with this stuff on my own?  No way.  Only when I have to.  I love to find amazing resources and use what they have provided, or re-create it on my own.  But the ultimate goal of this blog, is for you to save time on your parties by using the links I provide to all of these amazing websites full of ideas.

I'm an idea collector, and here's the Angry Birds party blueprint for you to follow!

Invitations:
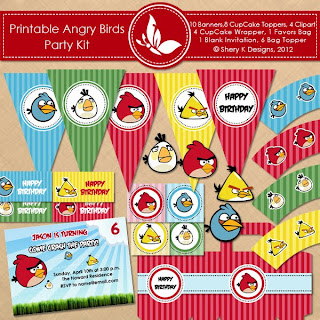
Free Printable Bithday Kit | Angry BirdsThis free printable from SheryKDesigns was the biggest help to my party.  I was able to make adorable invitations without doing hardly any work!  The kit even comes with the font to make the words look just like the game.

I used this kit for the invitations, banner, and sling-shot toppers.


I just copied the same format they used for the sample invite and re-sized it for a 4x6 photo print.


Decorations:
I wasn't able to find many Angry Birds party supplies in stores.  What I did find was at a local party store called Zurchers, but it was being discontinued.  Apparently the big craze had already come and gone there?  I did get a pig tablecloth and yellow bird napkins there.


1.  The backdrop was a green plastic tablecloth (every single store I went to was out of light blue!), and the little cutouts and Angry Birds words were cut out from the fruit snack boxes we got at Walmart.  The banner was made from the free kit mentioned above.
2.  The cute birds on the door were made by my friend who is a teacher.  She made them for a school bulletin board, and was kind enough to loan the to me.  I love them!
3.  Self-explanatory - the napkins.
4.  The baskets of treats were for the games.  They got to pick one depending on how good they did on the game.  At the bottom you can see the edge of the pig tablecloth.

Games/Activities:
As the kids showed up, we had Angry Birds Bingo set up for them to play.  I got the idea from THIS site.  My son told me that he wanted to play Bingo, and he wanted to do Angry Birds trivia.  I combined the two by reading off trivia questions to which they had to guess which square to cover.  I put a picture on there too so we can play it at our upcoming family reunion with younger kids.
I was pretty tired from party planning when I wrote these clues, so they are quite goofy!
I created the Bingo board and cards in Photoshop Elements using clipart from THIS website (awesome!) and screenshots from the actual Angry Birds game on Google Chrome.  I'm still working on finding the link for the cute graphic at the top, so I'll post it later.  I made 12 sets of Bingo cards, so every one of them is slightly different.  This was time-consuming, but not hard once I had them created.  You could also make these in a program like Microsoft Publisher.
<>


I got the idea for the can toss from THIS website.  We used a ball that I purchased at Walmart.  I didn't paint this one.  My daughter wants me to make sure to give credit to her and her friends for painting the cans.  Amazing job girls - thanks!  The kids got three tries to knock all of the cans down.

The pig bowling game came from THIS site.  We changed it up a bit by knocking down pigs instead of pigs knocking down colored bowling pins.  I spray painted them first, then added the faces with acrylic craft paints.  They had two tries to knock the pins down.

Both games were pretty easy and really just there to give them something else to do while they waited for their turn at the main activity.  The real Angry Birds game!
We had seen some other life-sized games on these sites HERE and HERE, but we really weren't excited about building the slingshots.  Then we saw a segment on a local talk show where they had played Angry Birds using a water balloon launcher and told where to find them.  I got this one at Big5 sporting goods for $20.  It takes three people to use it - two to hold and one to launch.  That's a big bonus for me since my two youngest boys can't do much damage with it without a helper!

I used the guidelines for painting plastic balls from the sites above.  But I had Zinsser Bulls Eye 123 primer/sealer and it worked amazingly well.  I painted the outline base coat with several layers of the white primer, then let it dry well.  The other colors were acrylic paint over the primer.  I didn't bother tracing the faces on, I just free-handed them, so they aren't perfect, but turned out pretty darn cute!  And I didn't use a sealer like the other sites suggested - and they didn't need it!  Those birds took a LOT of abuse and not a single one looks different from when I painted it.  Do make sure you have them inflated to the size you want them before painting though.  I'm pretty sure that doing it after would crack the paint.

The boxes were from kind neighbors and were painted by my teenagers.  Thanks guys!  The kids got four tries, with the four birds, to knock down the pigs and as much of the structure as they could.  They got a level 1,2, or 3 treat depending on how much they destroyed.

The top-left corner photo is of the Grandpa pig pinata (or Pigata as we like to call it).  The inspiration came from HERE.  I made it from a punch-ball I purchased a the dollar store and paper mache.  I found THIS recipe online and have used it several times.  It works really well.  This pinata used only 1/2 a batch.  My daughter did a fabulous job painting it.

Our final activity was for the birthday boy to launch the pinata.  Unfortunately it was so heavy with candy that it only went about two feet before landing on the ground with a thud.  My oldest son tried, then my husband.  It was just too heavy.  So they did the next best thing and launched it by hand about 20 feet into the air.  It took only two good landings before the kids tore into it and filled up their hands (and shirts) with candy.

Music:
Simple really.  We started the Angry Birds game on my husband's computer and put the speakers in the window.  It set the mood and made everyone want to dance along - for a while.  There's not a lot of variety to the theme song, so after a while we were just sick of it. :)  But it was fun music.

Food:
With past experience of scorching hot summer birthday parties, we found that the kids don't have much of an appetite, so we just did cupcakes, drinks and ice cream cups.  Since it was about 93 degrees outside, we also had cups and a cooler of ice water in the shade so they could stay hydrated.

Cake:


Evan told me he wanted a 'fancy' cake for his birthday and proceeded to show me some very elaborate ones made of fondant sculptures that I had pinned on my Celebrations board on Pinterest.  I have yet to attempt fondant, and knew I didn't have an extra 20 hours to spend on a cake.  I did find THIS cake though, and used it as inspiration for the cake and cupcakes that I made.

It was super easy to make.  I just made a round cake (I have a tall round pan I bought in Japan that fits a whole cake mix so I don't have to deal with layers), then froze it for about an hour in the freezer.  This makes it easy to put on the crumb coat of frosting.  It's just a thin layer of icing to coat the crumbs!  Then I traced the face into the icing and outlined it with a round tip and dark chocolate icing.  I don't like to add a ton of food coloring to get black, so I always just use dark chocolate for black.  Then, using a star tip, you just fill in the design with the desired colors.  It's as easy as coloring!

The red food coloring is from AmeriColor and it is good stuff.  I have tried other brands, and will always use this brand from now on.  I bought it at Hobby Lobby.  Duncan Heinz cream cheese frosting is my favorite for taste when I don't want to take the time to make homemade icing.  It works pretty well if it doesn't get too warm while decorating.  (That's why I won't show the sides!)

The cupcakes were made in a similar way, I just skipped the outlining.  The candy eyes (love them) are from Wilton, and the beaks were made with banana Laffy Taffy.  Roll it flatter with a rolling pin, then cut with a knife.  The eyebrows are the same chocolate frosting with a large round tip.  Adorable!

Favors:
I saw the idea for the bags HERE, but the download for the faces came from HERE.  I ordered the slingshots and balls from Oriental Trading Company.  They were a little pricey, but not too bad for a dozen slingshots and enough balls to give 5 each.  We put Chiclets gum, Dots, Crunch bars and Air Heads candies in with them.  Then the kids got to load up on other candies, Angry Birds fruit snacks, popsicles, and pinata candy throughout the activities and games.  Their bags were nearly overflowing by the time they left the party, and they ate a ton of it while still here!  They were pretty excited about it all though, especially the sling shots.  Hopefully I don't have any parents too angry with me over that - I did put a warning on the labels!  The labels were from the kit at the top of the post.  I modified them in Photoshop to fit my warning on them.
It was such a fun party and I thank my Mom and my family for all their help, and the wonderful ladies in the blogs mentioned in the links for their inspiration.  I hope you will do your own Angry Birds party.  If you do, you may earn the title I earned from my kids as the "Coolest Mom ever"!  Thanks guys!  You're worth it.

May 10, 2011

Spy Party

My son's spy party last year was a TON of work, but so much fun to put together.  I knew that I wanted the party to include clues to figure out and solve a mystery, but I wasn't sure exactly how to do it.  Some of my earliest ideas were so complicated that my family just stared at me like I was crazy when I tried to explain it to them.  I was getting myself confused!  So I will skip those ideas, and just tell you about what we did - because it worked.

THEME:
Our plan was to make our house a Top Secret Spy training center.  The Evil Dr. Chaos became our villain trying to ruin our party and blow up the loot (treat bags) if we didn't solve the clues to stop him in time.

INVITATIONS:
My parties always start with inspiration from other creative party planners out there on the internet.  I found an invitation that was a mini file folder, and that's what I duplicated, with my own twist of course.
I got the pattern for the mini file folders from here and sized them to be about 1/2 sheet when folded to fit into a 6"x9" envelope.  The font I used for the 'TOP SECRET' is Reprise Title found here. They all had another tag on them that read "For ____'s eyes only" so my son would know who to give them to.  The invitation included a mason cipher to solve the secret code which was "I love cake and ice cream". The font I used for the cipher was Fam-Code found here.


*I have a copy of the spy seal I used in the invites and for the front cover of the handbooks that I can email you.  Or get a blank one here. I also have versions of it for Canada, Australia, and the United Kingdom that I have made upon request.

Click on the links above to download the Spy Seals from Box.com

*Update 5/29/18: I'm sorry that the Spy Seals for the above countries are no longer available due to unintentional copyright issues. I will work on changing the name on the seals, re-designing the whole seal, handbook, badges and freebies to be even better and getting new ones available soon! The blank one is still available for now.

ACTIVITIES:
So MANY activities!!!  I'll just go in the order we did them.

First we had the boys complete a background check.  We asked them the secret password and then they were fingerprinted and received their security passes.  These were really fun to make with my NSA symbol on them and their names, code name, and name in bar code.  I bought plastic badge holders and clips at Walmart.

The fonts I used to make the badges and the training manual cover sheets were: Reprise Stamp, Due Date, and Free 3 of 9 (bar code font).  The bar codes actually spelled out everyone's names, so they were all different.  The kids got the 'Agent in Training' badges, my older kid helpers got the 'Top Secret Agent' badges and I was the 'Chief Operating Officer'.  You can see on these what I did with the Great Seal of the USA.  I added the rings and text, the key, the bomb and NSA on the shield and the sunglasses on the eagle to make him cool.
I took individual photos of each trainee at the party (in sunglasses), and my plan was to put their photo onto a new Top Secret Agent badge for completion of the program.  Unfortunately, my oldest son had his appendix rupture a couple of days after the party and I never got around to it.  The most important things must come first.  BUT, for all you UK readers, awesome reader Wendy created one for your use.  Download it here.  Thank you Wendy!  If you are from another country and need to change the badges with the above seals, here is the file for you.  For all US readers, the badges are contained in the Spy Handbook link below.

Fingerprinting:
I saw some fingerprinting sheets kind of like these on a website for child safety and made my own version on cards for each guest.  I just bought a cheap black ink pad at the dollar store and had my daughter fingerprint the boys and wipe off their fingers on a wet washcloth.


While waiting for everyone to get fingerprinted I had them do some stretching exercises to prepare for training, then we went into the back yard where their spy training manuals were set up on a table.  I bought big clips to hold in all of the papers, which was very important for an outdoor party with possible wind.

Download the Spy Handbook pages here!

*Update: The spy handbook had to be removed also (as mentioned above). I've added photos of the printables that don't have the Spy Seal on them for you to save and use.

The first page included the activities that we would be doing for the rest of the party and what skills they would develop.  Having a plan is SO important for a party with so much happening to keep you on schedule and make sure you remember to do everything.


#1  Spy Words.  This was a word search that I printed off from a website that creates word searches.  There are tons of them out there, you just type in the words and tell it what size you want your puzzle.  Since it took me quite a while to come up with the words for the word search, I will include them here since the whole purpose of this blog is to make party planning easier for everyone.  If you don't want to know them, just skip down to #2.  Intelligence, explosives, character, bribery, security, headquarters, cipher, objective, mystery, training, double agent, combat, laser beam, concealment, escape, evidence, mission, spying, eyewitness, fingerprints, clearance, informants, ammunition, secret, culprits, binoculars, rescue, fugitives, mastermind, observation, cover, badge, operative, disguise, incident, bugging, electronics, climbing, top secret, demolitions, warrant, bomb, footprints, target, investigation, villain, microchips, keys transmission, agency, magnify, undetectable, criminals.

We only spent a few minutes working on these and then moved on.  They could finish them at home.

#2  Code Breaking.  There are so many different codes, that I had a hard time deciding what ones to do.  I must have been really tired coming up with these, because they totally made me crack up (well, the second one did).  I got the Morse code photo last year on here, a site for kids run by the real NSA, but I can't find it on there anymore.

If you want to decipher them yourself, then don't read this part because here are the solutions:
'The blue moose left the party'
 'That thief is wearing a cheap suit.  Wait, that's my suit!' (that one was my favorite)
and 'The safe is in the outhouse'.  I know, they're stupid, but I was trying to make it fun for 9-year old boys, and if I get a kick out of it, it's just an added bonus. :)

#3  Memory Training.  We've all played this game before.  Bring out a tray of items, view them for 1 minute, write down all you can remember that was on the tray.  Went great with this party theme!  These are the items on our tray: digital camera, binoculars, cassette tape, air-mail envelope, $10.00 bill, measuring tape, pencil, flashlight, combination lock, Scotch tape, sunglasses, walkie-talkie, cell phone, pen, remote control, post-it notes, and it was all laying on top of the obituaries from the newspaper (nobody got that one).   At the bottom of this page is a little spot-the-difference puzzle I got from here.

#4  Pass the Dynamite.  This was fun to play, and fun to make the dynamite!  I love creating props.  I found the dynamite idea here, and made mine just using cardboard tubes stuffed with newspaper and wrapped with red tissue paper.  The colored wires were from the inside of a piece of electrical wire and they are just hot-glued into the tops.  I wrapped them together with black electrical tape.  If you want your dynamite to last for more that one party, then I suggest you Mod-Podge over the tissue paper because it tore from being handled so much.  I made 5 sticks, and I recommend a digital timer.

To play the game, you just set the timer and start passing the dynamite around a big circle like a hot potato.  When the timer goes off, whoever is holding it - blows up!  They are then out of the game until it gets down to the last person.

#5  Gum Shoe Detective.  The boys all traced their shoe on a piece of paper and then we mixed them up and gave everybody a tracing.  They had to try and find out who the shoe print belonged to.  It wasn't that exciting, so I don't recommend it.  If nobody seems interested, I quickly move to the next activity.  I think it would have been more fun to make a shoe print on a piece of tinfoil and they could have checked the tread pattern on the bottom of everyone's shoes.

#6  Target Practice.  This activity failed due to Nerf gun failure.  I had printed out a target that they were going to take turns shooting at with Nerf guns, but apparently my son's had killed their guns and didn't let me know about it until we tried using them at the party.  If I would have known that I would have done something like shooting Dixie cups off of a board with a squirt gun or something.  Luckily we had plenty of other activities to fill the time.

#7  Laser-beam Avoidance.  I got two wooden poles and hooked a red piece of yarn between them.  If they got under it, we lowered the string.  You know, it was like Limbo, but the boys could go under the yarn any way they wanted to as long as they didn't touch the laser-beam.  We got it down to about 6" off the ground and some of those boys could still scoot on their bellies under it.  They had a lot of fun with this game.

#8  Bomb Squad.  We had to move indoors to do this activity since balloons don't agree with grass.  We blew up tons of small black water balloons before the party and placed them on the carpet.  Each boy had about 30 seconds to pop as many bombs as they could while everyone else counted.  Some boys could only do a few and some did a lot.  It made a big mess, but boys love making messes (and noise).

FOOD:
#9  Evidence Destroying.  We told them that they had to get rid of any evidence that we had a party by eating all of the food.  We had pizza and root beer for the food, nothing fancy, and cupcakes and ice cream cups.  The cupcake toppers were just made with clip-art punched into circles and placed on wooden skewers.

As they finished eating, the doorbell rang and there was an envelope on the doorstep with an MP3 player in it and a cipher for a secret code.  We hooked the MP3 player up to a speaker and it played this message:

"Welcome new recruits, I am the NSA President.  We are aware that you are here for spy training, but an urgent situation has arisen.
The Evil Dr. Chaos has been trying to disrupt this school for years.  We have just been informed that he has stolen your loot bags and set a bomb to blow them up!  You are the only available agents in the area, and all will be lost if you can't unravel the clues and diffuse the bomb before it goes off.
If you complete this assignment you will automatically be promoted and receive your official spy certification.  The secret message we discovered is hidden in the mailbox.
Be careful - and good luck!"

I wanted it to be in my husband's voice, but he was out of town (in the middle of the dessert) with no cell phone service or I would have had him call and say the message over the phone.  I had my oldest son record it for me.

This photo shows all of the different clues and the ciphers for each one.  I thought they would make more sense if you could see them in a photo.  Some are also included in the Spy Handbook files.
Clue #1 in the mailbox.  I got this wording idea from another site, but I can't find where. It was great though and got adapted to fit our party! I wrote the message to include all of the letters I needed to spell out my clue, then those letters were changed to italics.  It's hard the tell in this font which is called Ghostwriter.  Then I drew little boxes around all of the correct clue letters and changed the font to white and printed it so only the boxes showed up.  With an Exacto knife I cut out the little boxes, and when you lay it over the message the next clue is revealed.  It says 'The next clue is on the door of the shed'.


Clue #2 tied to the door of the shed.  This one used a code that was in their training handbooks which they had just used, so they recognized it and rushed over to figure out the code.  We tried to make sure that different boys got to work on deciphering one of the codes if they wanted a turn.  This clue said, "The hen is in the nest."

Clue #3 was in the nesting boxes for our chickens.  This clue used the Mason cipher which had come with their birthday invitation and included two ciphers.  There is actually a font for this code called FAM-Code so you don't have to draw little pictures, you can just type in what you want it to read.  The clue spelled out, "They lay eggs in sand, but in this one you dig!"

Clue #4 was in our turtle sandbox.  The clue was in a plastic bag which contained a small mirror.  I printed out the clue in reverse so they had to use the reflection in the mirror to read it.  It read, "So you think you're on my heels?  Well, this final clue is on wheels.  It doesn't drive you anywhere, but pulls your stuff in there.  In a chest shut up tight, but don't search in the back yard or it will take all night.  You'll have to stop me soon, because if you're too late then....BOOM!!!"

Before the party I lit this paper on fire to try and make it look like someone tried to burn it.  Well, I almost had to start over because I barely got the flames put out in time! (Do that part near water!)

The bomb and treat bags were hidden in a tool chest on our trailer.  The kids all grabbed their loot and the bomb and after getting a photo of them all, I told them that their final task was to de-fuse the bomb by destroying it.  They happily tore it to shreds and it was full of candy.  It would be fun to do a pinata for the bomb, but we were out of time anyway.

The bomb was made out of a cardboard dishwasher tablet canister.  You could also use a round oatmeal container.

TREAT BAGS:
I wanted to get cloth bags made for the loot bags, but it didn't happen.  I used white paper sacks instead, and I think they turned out just as cute!  The $ labels are in the Spy Handbook.
They included: A notebook, magnifying glass, Mentos (if you've seen the Agent Cody Banks movies you know why), 100 Grand candybar, Smarties, Atomic Warhead jawbreakers, a squirt gun, and play money.  They also got to take home their training folders, badges and pencils.


WHEW!  That was exhausting just blogging about the party, you can only imagine how I felt after planning it.  It was really a lot of fun though, and now completely ready for you to copy.  All you need to do is come up with clues to fit your party, make some cupcakes and go shopping for loot!  Yeah, I know there's a little more to it than that, but hopefully I got some good spy party vibes heading your way.  Happy party planning!