
I do need to add, that my son Evan, who the party was actually for (they are all kind of for me though :) is also a big Angry Birds fan. It's a favorite for him to play on my husband's iPad. So it wasn't hard to convince him that it was the perfect theme for his 9th birthday.
My thanks though, goes to Pinterest, where I got all of my ideas for the party. You thought I came up with this stuff on my own? No way. Only when I have to. I love to find amazing resources and use what they have provided, or re-create it on my own. But the ultimate goal of this blog, is for you to save time on your parties by using the links I provide to all of these amazing websites full of ideas.
I'm an idea collector, and here's the Angry Birds party blueprint for you to follow!
Invitations:
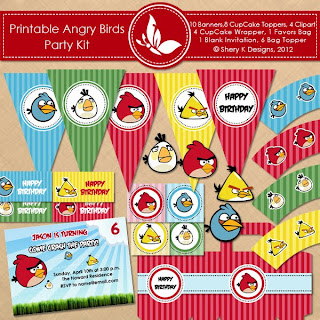 This free printable from SheryKDesigns was the biggest help to my party. I was able to make adorable invitations without doing hardly any work! The kit even comes with the font to make the words look just like the game.
I used this kit for the invitations, banner, and sling-shot toppers.
I just copied the same format they used for the sample invite and re-sized it for a 4x6 photo print.

Decorations:
I wasn't able to find many Angry Birds party supplies in stores. What I did find was at a local party store called Zurchers, but it was being discontinued. Apparently the big craze had already come and gone there? I did get a pig tablecloth and yellow bird napkins there.

1. The backdrop was a green plastic tablecloth (every single store I went to was out of light blue!), and the little cutouts and Angry Birds words were cut out from the fruit snack boxes we got at Walmart. The banner was made from the free kit mentioned above.
2. The cute birds on the door were made by my friend who is a teacher. She made them for a school bulletin board, and was kind enough to loan the to me. I love them!
3. Self-explanatory - the napkins.
4. The baskets of treats were for the games. They got to pick one depending on how good they did on the game. At the bottom you can see the edge of the pig tablecloth.
Games/Activities:
As the kids showed up, we had Angry Birds Bingo set up for them to play. I got the idea from THIS site. My son told me that he wanted to play Bingo, and he wanted to do Angry Birds trivia. I combined the two by reading off trivia questions to which they had to guess which square to cover. I put a picture on there too so we can play it at our upcoming family reunion with younger kids.
 |
| I was pretty tired from party planning when I wrote these clues, so they are quite goofy! |
<>

I got the idea for the can toss from THIS website. We used a ball that I purchased at Walmart. I didn't paint this one. My daughter wants me to make sure to give credit to her and her friends for painting the cans. Amazing job girls - thanks! The kids got three tries to knock all of the cans down.
The pig bowling game came from THIS site. We changed it up a bit by knocking down pigs instead of pigs knocking down colored bowling pins. I spray painted them first, then added the faces with acrylic craft paints. They had two tries to knock the pins down.
Both games were pretty easy and really just there to give them something else to do while they waited for their turn at the main activity. The real Angry Birds game!

I used the guidelines for painting plastic balls from the sites above. But I had Zinsser Bulls Eye 123 primer/sealer and it worked amazingly well. I painted the outline base coat with several layers of the white primer, then let it dry well. The other colors were acrylic paint over the primer. I didn't bother tracing the faces on, I just free-handed them, so they aren't perfect, but turned out pretty darn cute! And I didn't use a sealer like the other sites suggested - and they didn't need it! Those birds took a LOT of abuse and not a single one looks different from when I painted it. Do make sure you have them inflated to the size you want them before painting though. I'm pretty sure that doing it after would crack the paint.
The boxes were from kind neighbors and were painted by my teenagers. Thanks guys! The kids got four tries, with the four birds, to knock down the pigs and as much of the structure as they could. They got a level 1,2, or 3 treat depending on how much they destroyed.
The top-left corner photo is of the Grandpa pig pinata (or Pigata as we like to call it). The inspiration came from HERE. I made it from a punch-ball I purchased a the dollar store and paper mache. I found THIS recipe online and have used it several times. It works really well. This pinata used only 1/2 a batch. My daughter did a fabulous job painting it.

Music:
Simple really. We started the Angry Birds game on my husband's computer and put the speakers in the window. It set the mood and made everyone want to dance along - for a while. There's not a lot of variety to the theme song, so after a while we were just sick of it. :) But it was fun music.
Food:
With past experience of scorching hot summer birthday parties, we found that the kids don't have much of an appetite, so we just did cupcakes, drinks and ice cream cups. Since it was about 93 degrees outside, we also had cups and a cooler of ice water in the shade so they could stay hydrated.
Cake:

It was super easy to make. I just made a round cake (I have a tall round pan I bought in Japan that fits a whole cake mix so I don't have to deal with layers), then froze it for about an hour in the freezer. This makes it easy to put on the crumb coat of frosting. It's just a thin layer of icing to coat the crumbs! Then I traced the face into the icing and outlined it with a round tip and dark chocolate icing. I don't like to add a ton of food coloring to get black, so I always just use dark chocolate for black. Then, using a star tip, you just fill in the design with the desired colors. It's as easy as coloring!
The red food coloring is from AmeriColor and it is good stuff. I have tried other brands, and will always use this brand from now on. I bought it at Hobby Lobby. Duncan Heinz cream cheese frosting is my favorite for taste when I don't want to take the time to make homemade icing. It works pretty well if it doesn't get too warm while decorating. (That's why I won't show the sides!)
The cupcakes were made in a similar way, I just skipped the outlining. The candy eyes (love them) are from Wilton, and the beaks were made with banana Laffy Taffy. Roll it flatter with a rolling pin, then cut with a knife. The eyebrows are the same chocolate frosting with a large round tip. Adorable!
Favors:


